Push notifications are the bread and butter of app marketing. They hold a huge potential to boost app engagement by providing valuable, personalised messaging, and they work wonders for re-engaging lapsed customers. To take full advantage of this, it is important to understand push notification best practices. But, for iOS users, there is one catch…

Unless you are dealing with Android app users who are automatically opted into receiving push notifications (which can be switched off in the settings section), your users have to give permission for you to access their information and send push notifications. Some apps actually depend on being able to access a phone’s data and not getting that access can render the app useless. For example, an app that depends on knowing a user’s location or one that relies on push notifications playing a critical role in getting the user to form a habit of using your app.
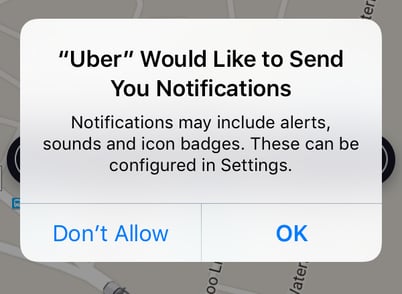
The good news is, it isn’t impossible to convince users to opt-in. But it isn’t easy either. In fact, with iOS systems you only get one chance to ask app users to opt-in to push messaging, using their dialog, which looks like this:
Related content: Video - The Best Practices for Push Notification Permissions
Once a user clicks ‘Don’t Allow’ at this stage, then it’s a done deal. The only other way of reversing this is with a re-permissions campaign using other channels such as email or in-app messaging. However, this no longer becomes a one tap process and now involves five painful steps as shown here by Twitter. This is a lot of effort for a smartphone user and is likely to significantly lower your chances of them opting back in.

The Two Most Common Approaches
Techcrunch discusses the two most common approaches used by mobile apps when asking for permission:
1. The Initial Blitzkrieg (not recommended)
This occurs right when a user opens the app for the first time and are blasted with “Can we access your push notifications?”, “Can we access your camera?”, “Can we access your location?”, “Can we access your contacts?”
Um, how about no?
When a user isn’t familiar with the ins and outs of an app and doesn't yet understand the value of providing information, then the chances are, they are going to tap ‘Don’t allow’. The first version of the app Cluster took this approach and only about 30 - 40 % of users opted in.
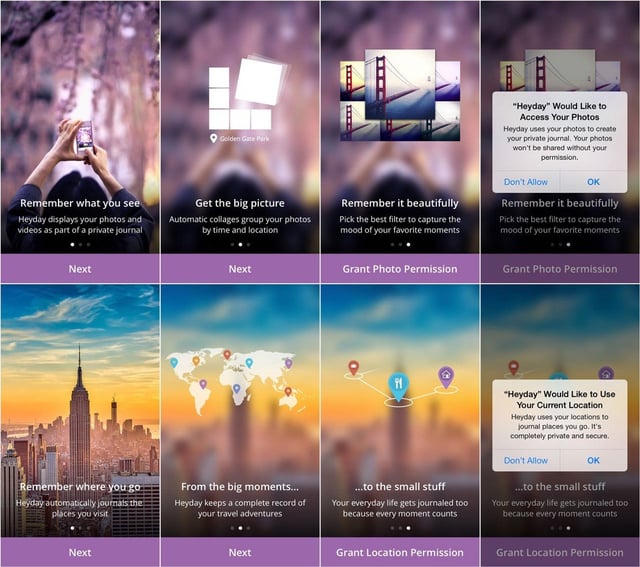
2. The Benefit Explanation
This approach works slightly better than the first one, by explaining the benefits the user will receive before popping the question. You can see how HayDay uses this method below.
5 iOS Push Notification Permission Best Practices
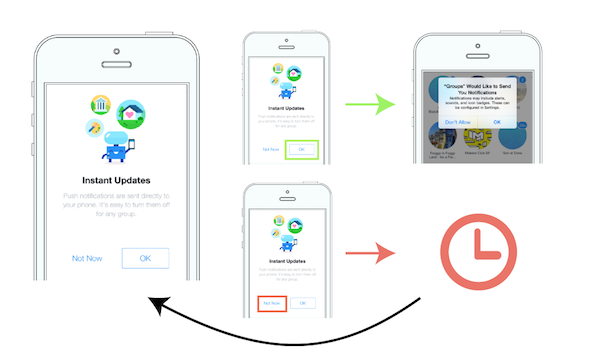
Remember what I said earlier about only getting one chance with the iOS dialogue? Well, here’s a clever little way around this. Pre-permission messages are the mobile marketer’s life saver as there is no limit on the number of times you can use them. This gives you the chance to design your own custom made in-app message to gauge whether or not the user is ready to opt-in for real to your push messaging. If your user says yes to your own message then you can go ahead and launch the iOS permission dialogue to get them to opt-in. If not, no biggie. Just don’t launch the iOS dialogue and try again at a later date when you feel your user is more engaged.
 Source: Localytics
2. Don’t jump straight in there
Play it cool. You wouldn’t ask someone to marry you on a first date as that’s a sure-fire way to scare them off. So don’t ask your users to opt straight in either as this is basically a guaranteed failure. Unless you are a well-known app such as Facebook or Whatsapp, the chances are your user wants to get to know you a little bit more before jumping into any commitment. These early days are all about building trust and providing value. Focus on showing them why your app is amazing, and then in time, you can pop the question.
3. Set certain criteria
Setting certain criteria before launching permission requests can be a good way to target engaged users and thus increase your opt-in rate. For example, if you set your permission request to launch after the user has opened the app 3 or more times then they have got some time to get to know the value of your app and are more inclined to opt-in.

4. Show value with your permission request
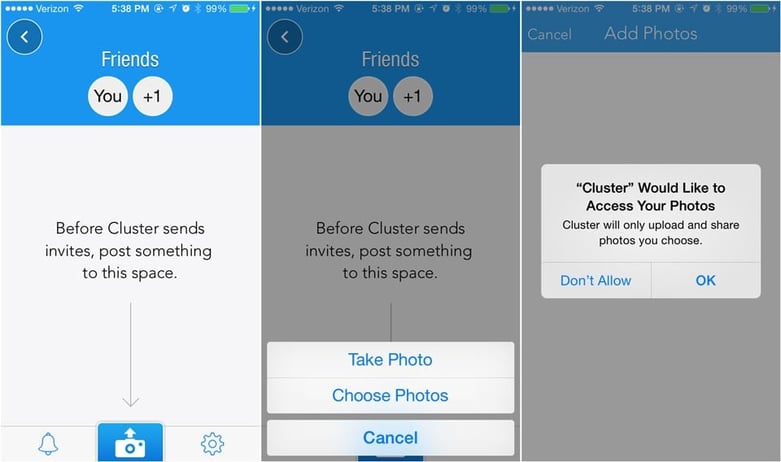
When testing how best they should ask for permissions Cluster discovered that users were way more likely (89%) to opt-in when the user actually triggered the prompt themselves. They worked out what value their user would get from giving access to each permission request, and timed when they asked for access at exactly the right time when the user required it so that the user could easily understand the value too. Rather than asking for access to photos, contacts and for permission to receive push notifications all at the one time and for no real reason, Cluster did this…
- Photos
As an app for sharing photos with private groups of family and friends, having access to photos is pretty necessary for Cluster to be functional. But instead of asking for access to this when the user opened the app for the first time, Cluster waits until the user has had a bit more time to get acquainted with their app. They ask for permissions right until the moment the user chooses to upload a photo themselves. At this point, it is really a no-brainer to give access.
- Contacts
When it came to contacts, a similar approach was taken. They asked themselves what the biggest benefit was to granting contact access. This was the fact that it saved the user time in entering each individuals contact information manually, but Cluster knew they had to wait until the user understood that too. So they let their users enter a contact's name into the box first, then when this did not auto-fill the contact details from their iPhone the permissions dialogue was prompted. They found 100% of their users accepted this prompt.

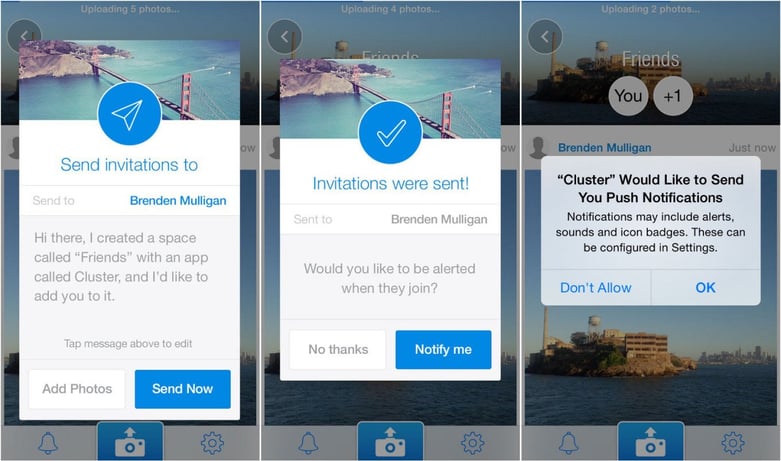
- Push Notifications
Finally, when it came to push notifications they discovered the value for their users in opting into this was to be notified when their friends join the private space they have created. So again, they waited for the right moment, when the user would also understand this value. This moment happens when the user creates a space for the first time and invites their friends and the prompts happen as shown below. During user testing, Cluster noticed a 100% opt-in rate for this method also.
5. Keep testing
As with everything, the trick is to keep testing it. You should make use of A/B testing to learn what your users are more likely to respond to, whether that is a change in imagery, design, messaging or timing. Every app is individual and its user requirements are different so you need to keep tweaking to find out what gives your app the best opt-in rates.
Gaining iOS permissions to access user information and send push notifications is vital to the success of most apps. Every app is different, so figure out how allowing access to whatever it may be, provides value to your user and demonstrate this to the user before the prompt appears and your chance for success will be much greater.
Get started on your free trial Hurree today and discover how to truly harness the power of analytics and transform your company reporting using cross-platform dashboards. If you have any questions then feel free to reach out to contact@hurree.co, we'd be happy to answer them!


Share this

3 Industries Boosting UX With Informative Push Notifications

[Video] 5 Things That Make a Really Great Push Notification Campaign